Getting Started #back to top
- Item Name : NextWoo - WooCommerce Builder for Elementor & Gutenberg
- Item Version : v4.0.5
- Last Updated : 25 April 2022
- Author : ThemeDev
First of all, Thank you so much for purchasing this plugin and for
being my loyal customer.
You are awesome!
You are entitled to get free lifetime updates to this product +
exceptional support from the author directly.
Be careful while editing
the template. If not edited properly, the design layout may break
completely.
No support is provided for faulty customization.
Quick Start #back to top
Thank you so much for purchasing our plugin called NextWoo - WordPress Plugins. Please feel free to contact us if you have questions or problems about this plugins. No guarantee is provided, but we will do our best to provide you with the best possible assistance.
- Documentation - That's where you
- License - Some info's about plugins licencing terms
- Dummy Content - Placeholder content for testing the plugins
- SampleData - Import Data to get the exact Site as the Preview Page
- Upload - This is where all Plugins files are (zipped & unzipped format)
Please read more about wordpress here
First, make sure you have WordPress version 4.7 or higher installed, by checking the update panel within your current WordPress installation. While NextWoo might work with older versions of WordPress, it is recommended to have 4.7 or higher version of WordPress.
- Next, install and activate 2.7 or higher version of Elementor plugin, if you are comfortable with it.(Optional)
- Then you have to install and activate the Woo-commerce plugin.
- Finally, install and activate the latest version of NextWoo plugin.
- Now you ready to use NextWoo, so download the plugin ZIP file, and save it somewhere handy on your computer, as you will be using the included files for the rest of the installation process.
The first option how to install this Plugins would be to directly upload the nextwoo.zip file via WordPress Plugin Uploader.
- Minimal requirements:
- PHP 7+
- Php.ini settings:
upload_max_filesize = 32M

													post_max_size = 48M

													memory_limit = 256M

													max_execution_time = 600

max_input_time = 400 - MySQL 5.0+
- Wordpress 5+
- Please make sure you have proper version of wordpress installed.
- Log Into WordPress and go to Plugins > Add New
- Find the NextWoo Plugin click activate
- FTP Upload:
- Unzip the "nextwoo.zip" file from plugin folder
- Open up your FTP manager and connect to your hosting
- Browse to wp-content/plugins
- Upload the nextwoo in plugins folder
- Log Into WordPress and go to Plugins > Add New
- Find the nextwoo Plugin and click activate
- Wordpress Dashboard:
- Log into your WordPress backend
- Navigate to Plugins > Installed Plugins
- Click Add New
- Now you just need to find the "nextwoo.zip" in the Upload folder and hit Install now.
- After complete installation click on active button to active The plugin.
If you are experiencing any issues during the installation I would recommend to check out this
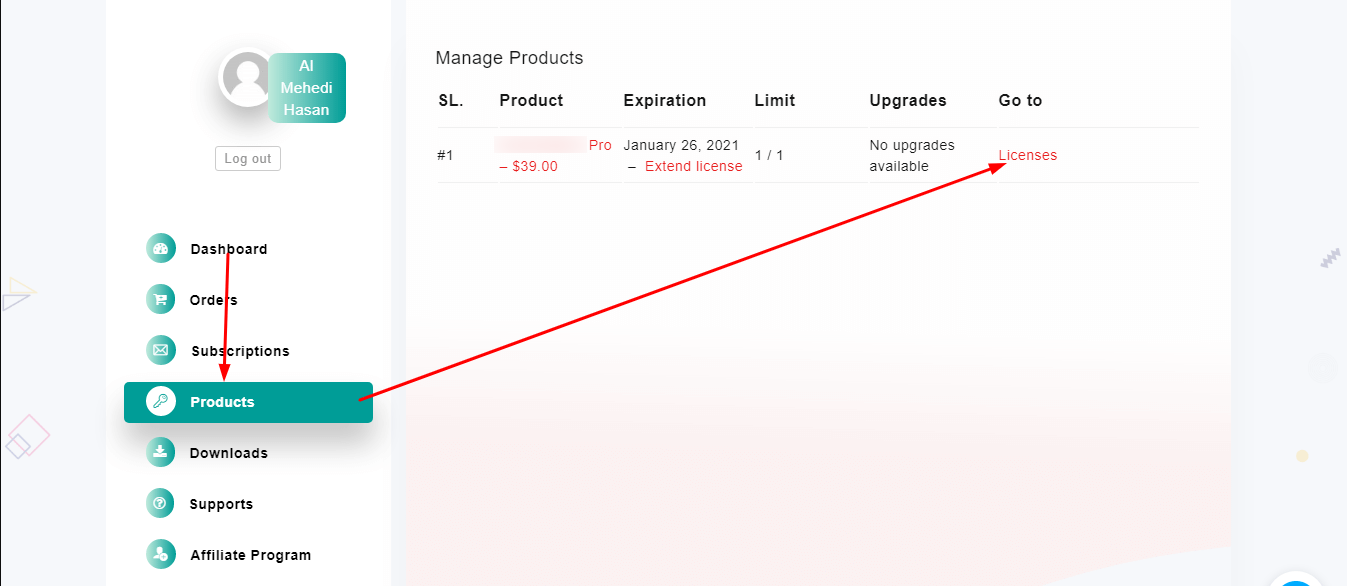
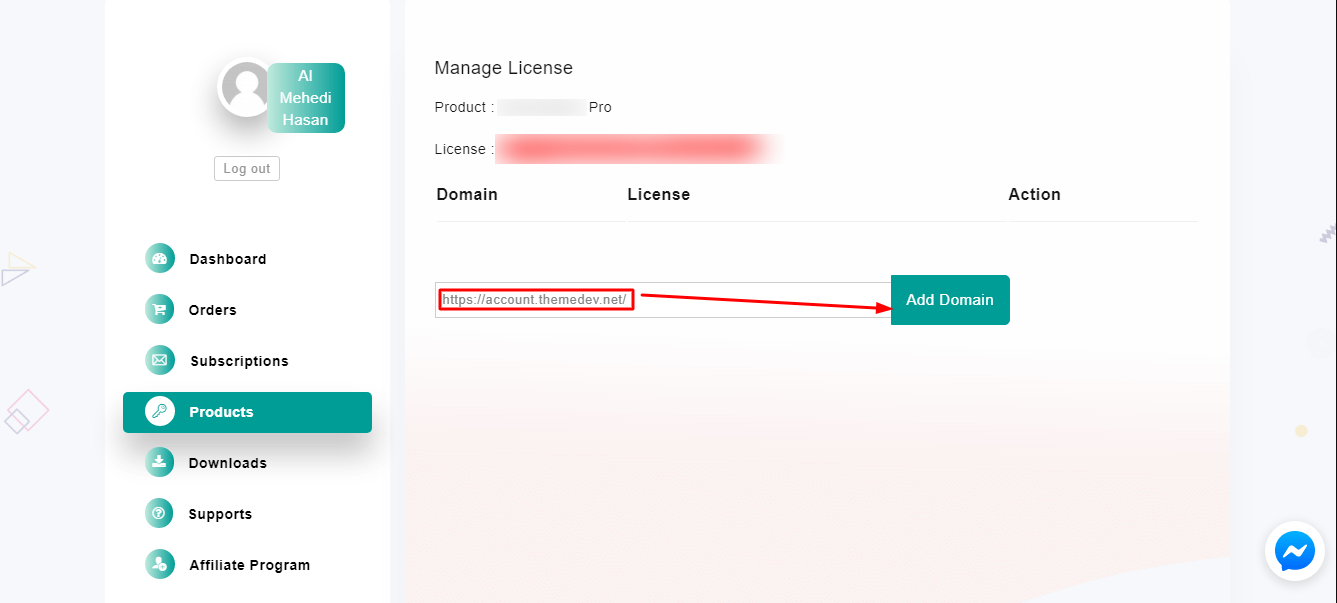
After purchase NextWoo Pro, you have to log in 'account.themedev.net' site. Latterly, you have to follow that guidance given below.
Plugins Settings #back to top
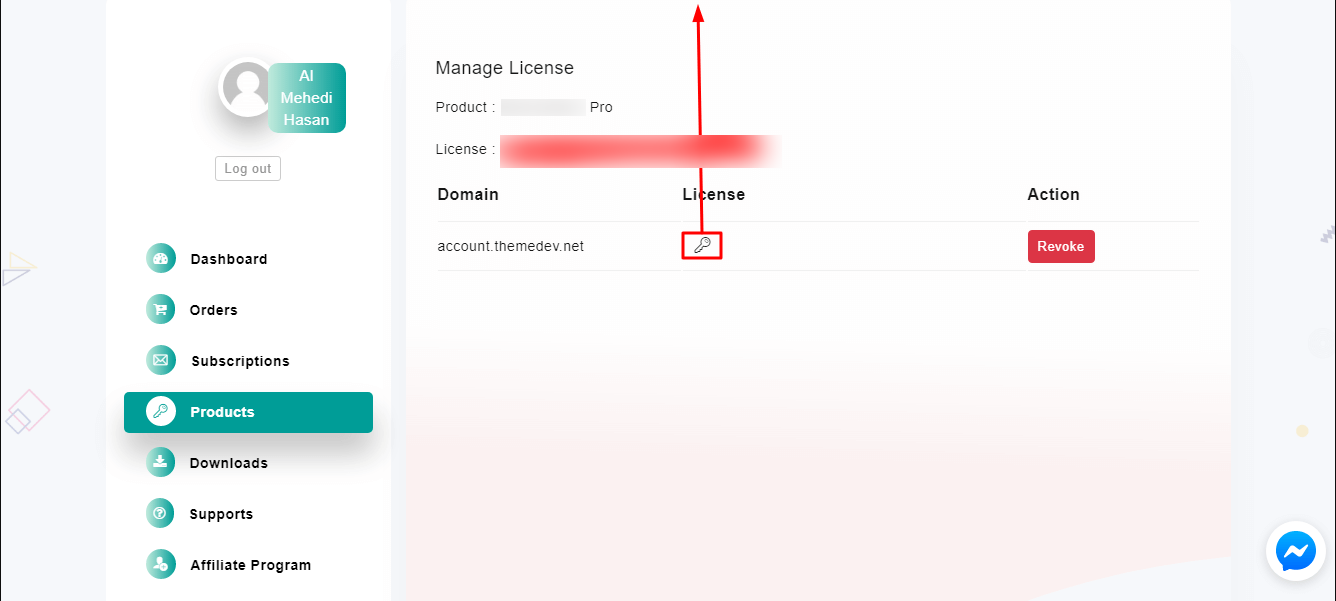
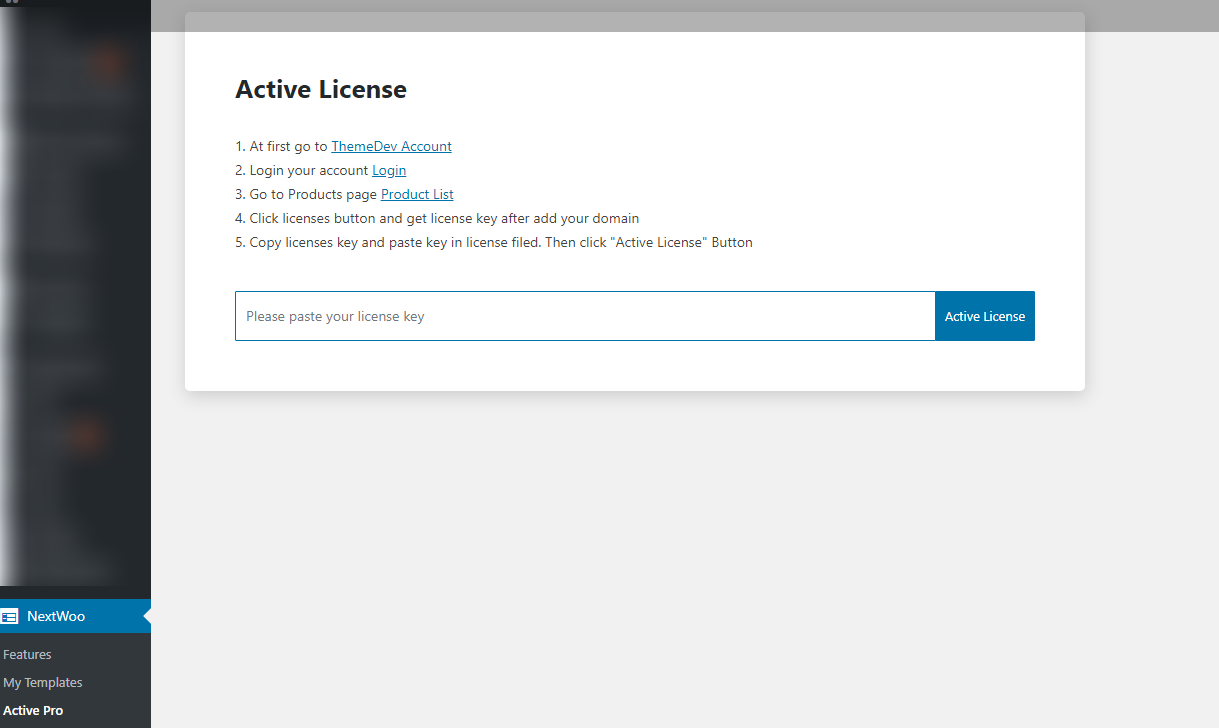
To get all the services of NextWoo, you have to activate the product license at first. Here are the license activation rules:
- 1. Configure WordPress Dashboard -> NextWoo -> Active Pro.
- 2. Now put your license from 'account.themedev.net'. Finally click on Active License button. That's it!
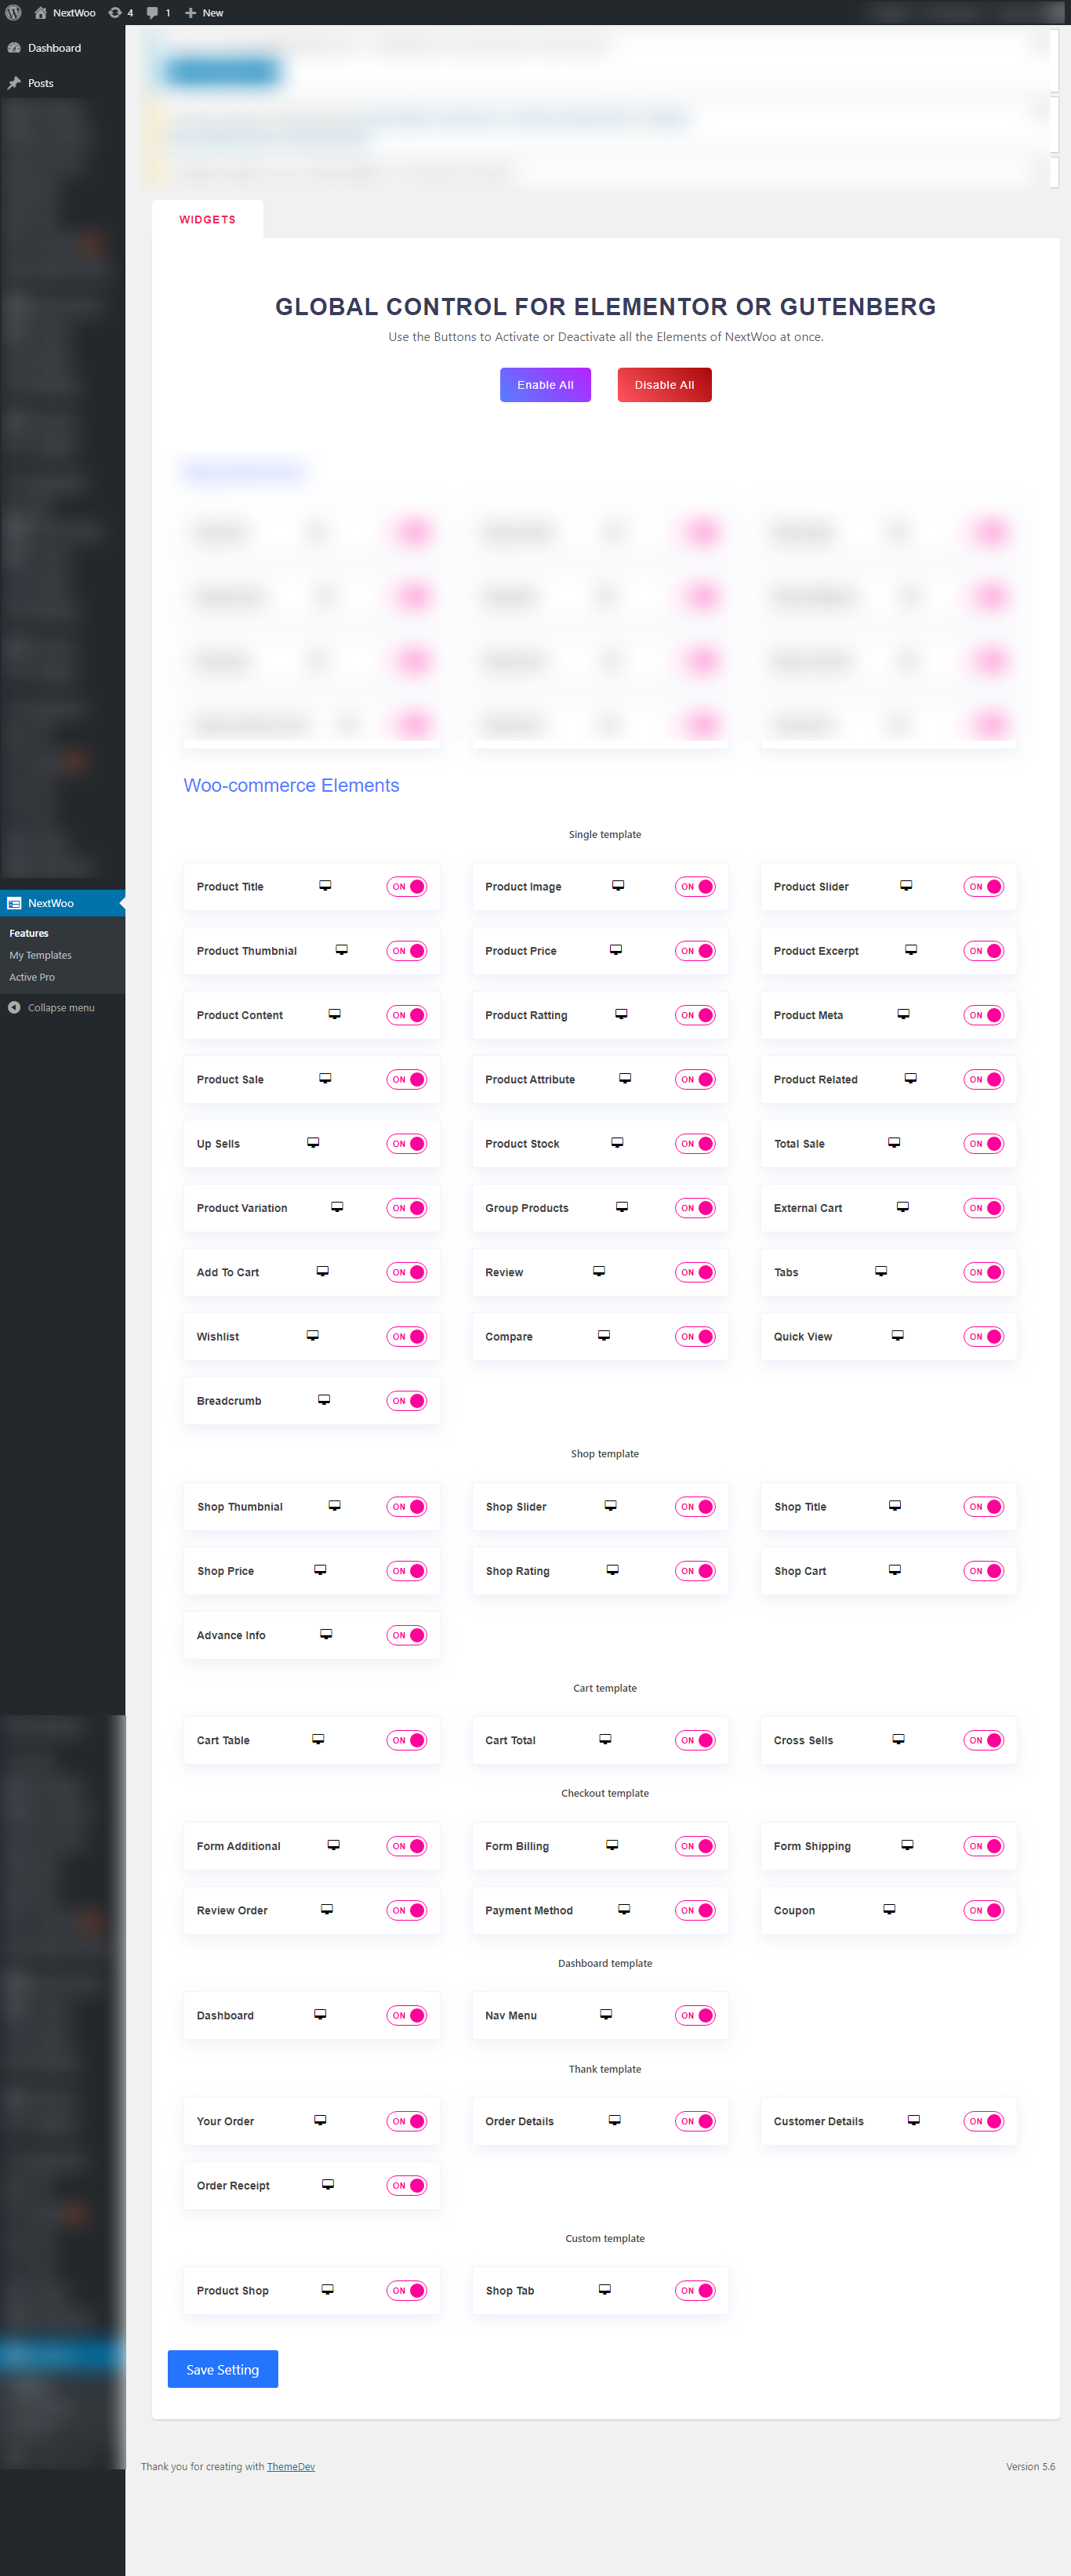
- 1. Go to Dashboard -> NextWoo -> Features -> Widget
- 2. Now click on Enable All -> Save Setting button.
WooComerce #back to top
In order to create single product template, you need to follow sevaral steps given below.
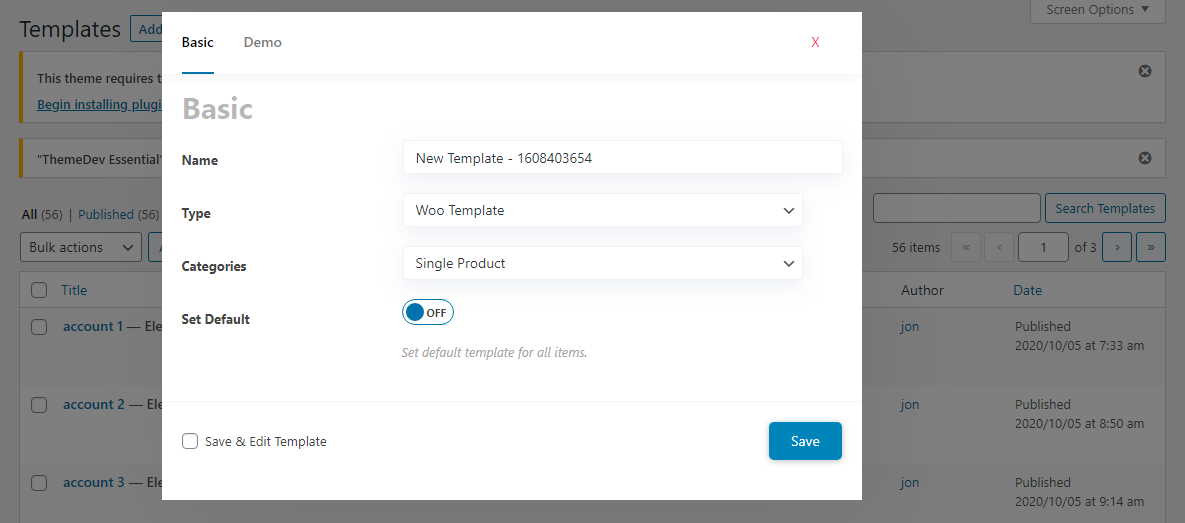
- 1. Go to WordPress Dashboard -> NextWoo -> My Template -> Add New.
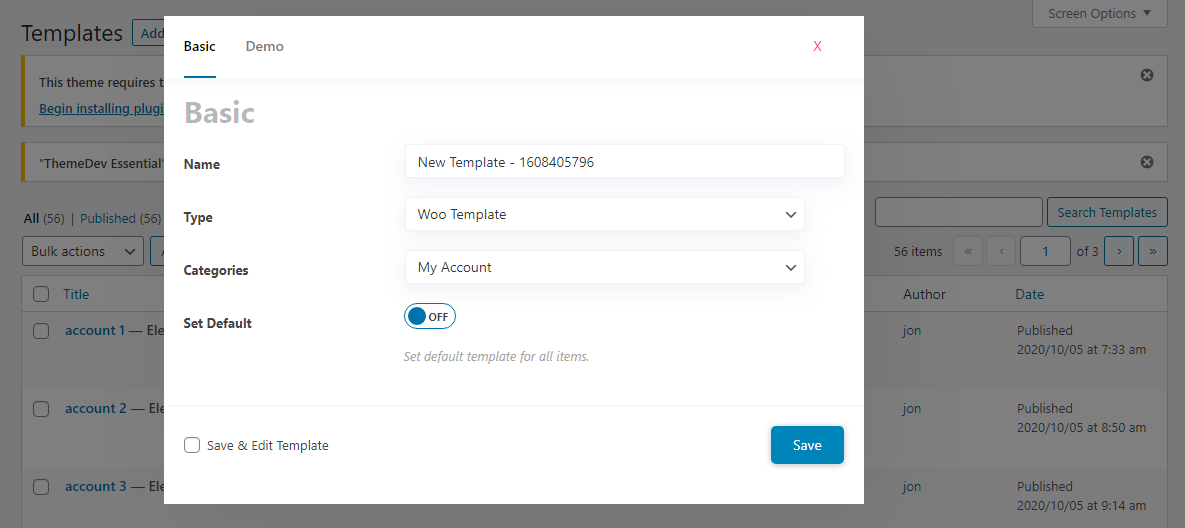
- 2. Click on the Basic tab.
- 3. Name: Give an appropriate name for the template.
- 4. Type: Select Woo Template from drop-down menu as type.
- 5. Categories: Select Single Product as template category.
- 6. Set Default: Click the Set Default switch button to on it.
- 7. Finally click on the Save button.
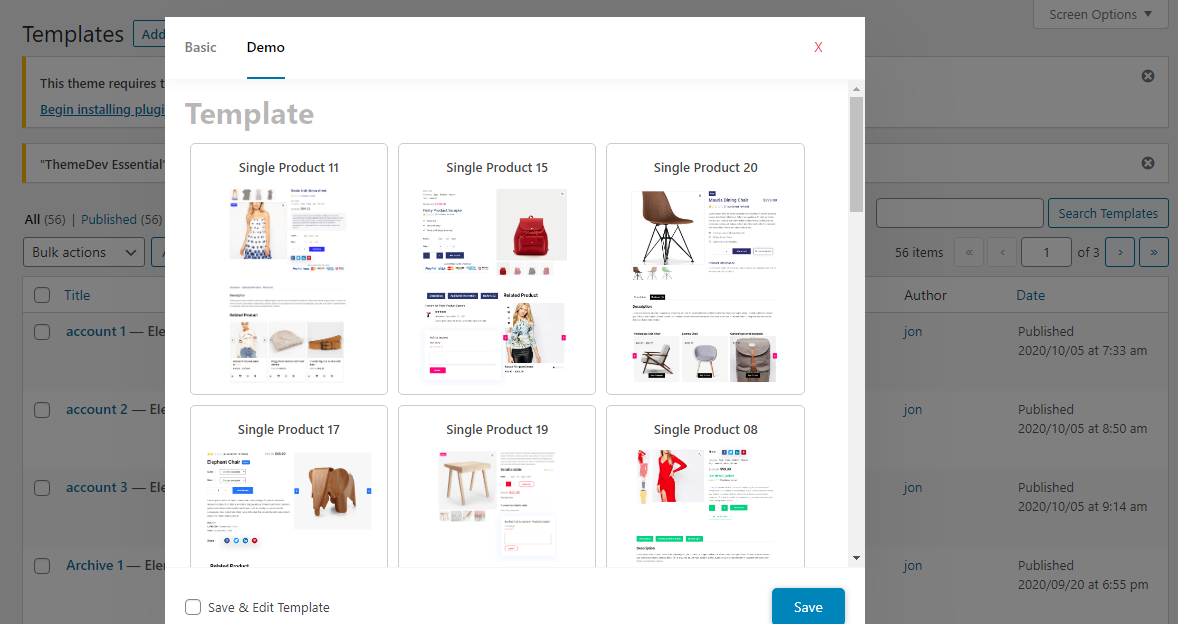
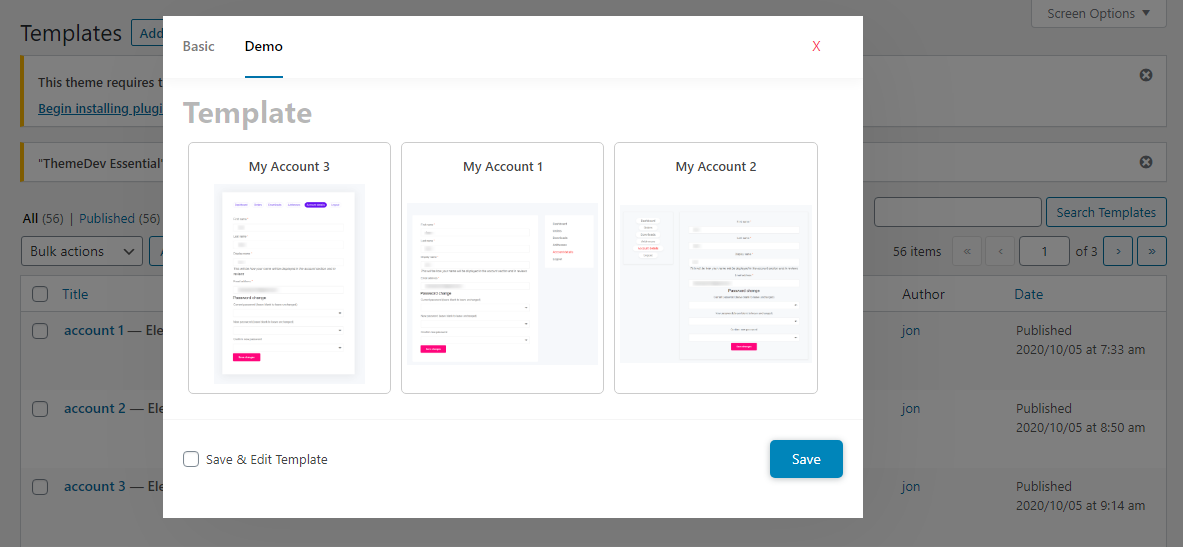
- 8. In order to get predesigned demo, please click on the Demo tab where you will get plenty of demos.
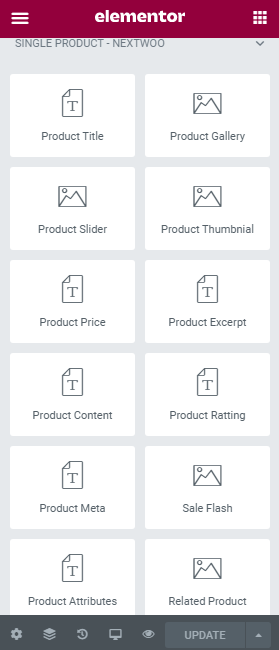
- 9. Available Elementor widget to design Single Product template.
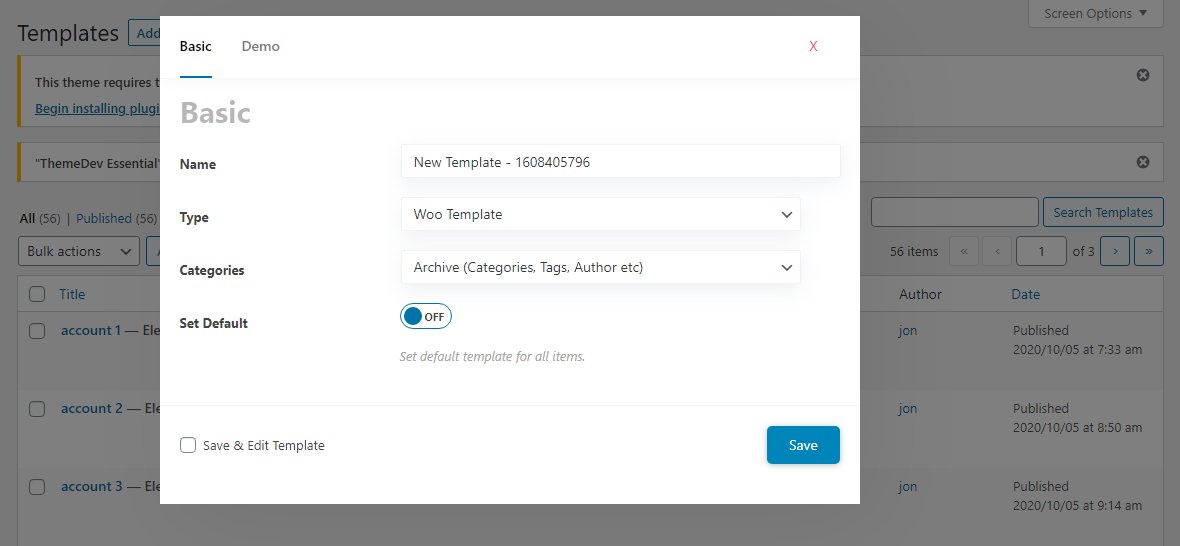
For building a archive product template you should follow some specific rules.
- 1. Go to WordPress Dashboard -> NextWoo -> My Template -> Add New.
- 2. Click on the Basic tab.
- 3. Name: Give an appropriate name for the template.
- 4. Type: Select Woo Template from drop-down menu as type.
- 5. Categories: Select Archive(Categories, Tagsc Author etc) as template category.
- 6. Set Default: Click the Set Default switch button to on it.
- 7. Finally click on the Save button.
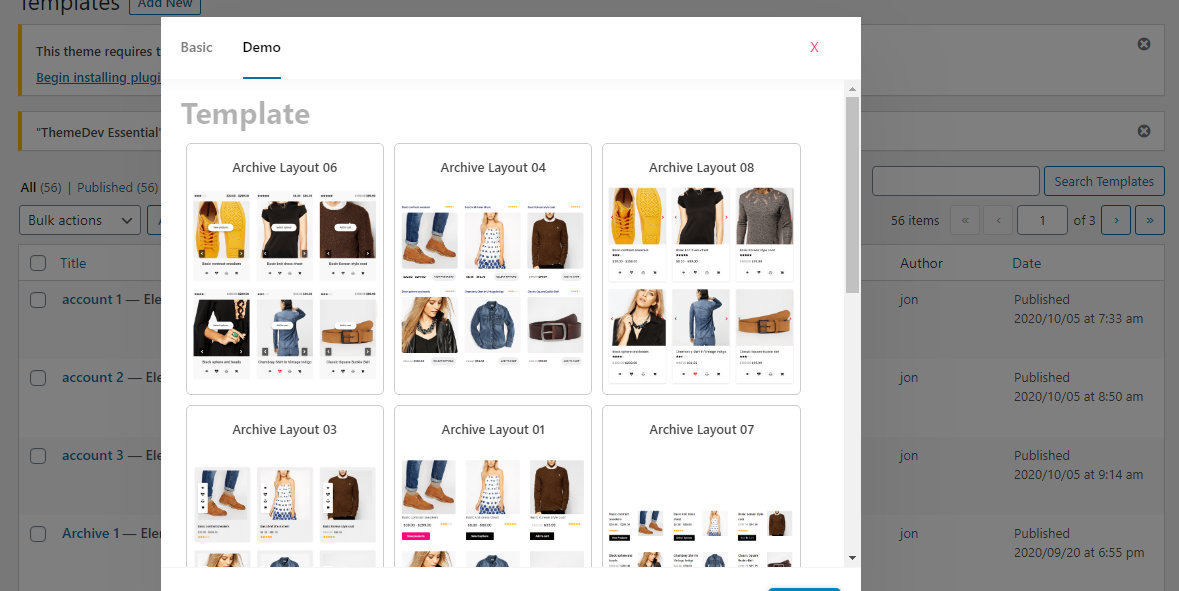
- 8. In order to get predesigned demo, please click on the Demo tab where you will get plenty of demos.
- 9. Available Elementor widget to design Product Archive template.
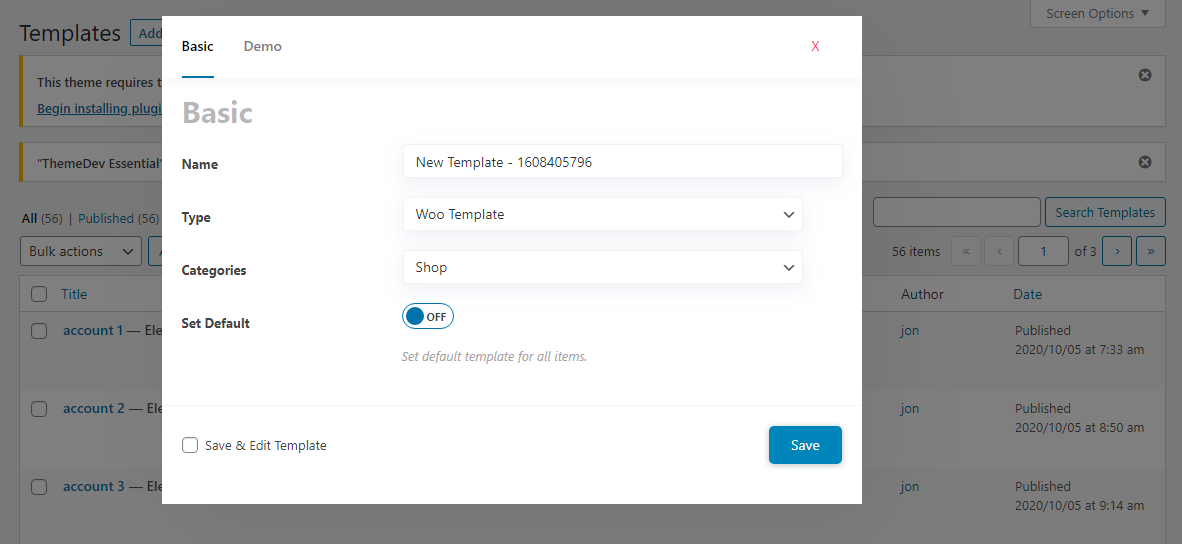
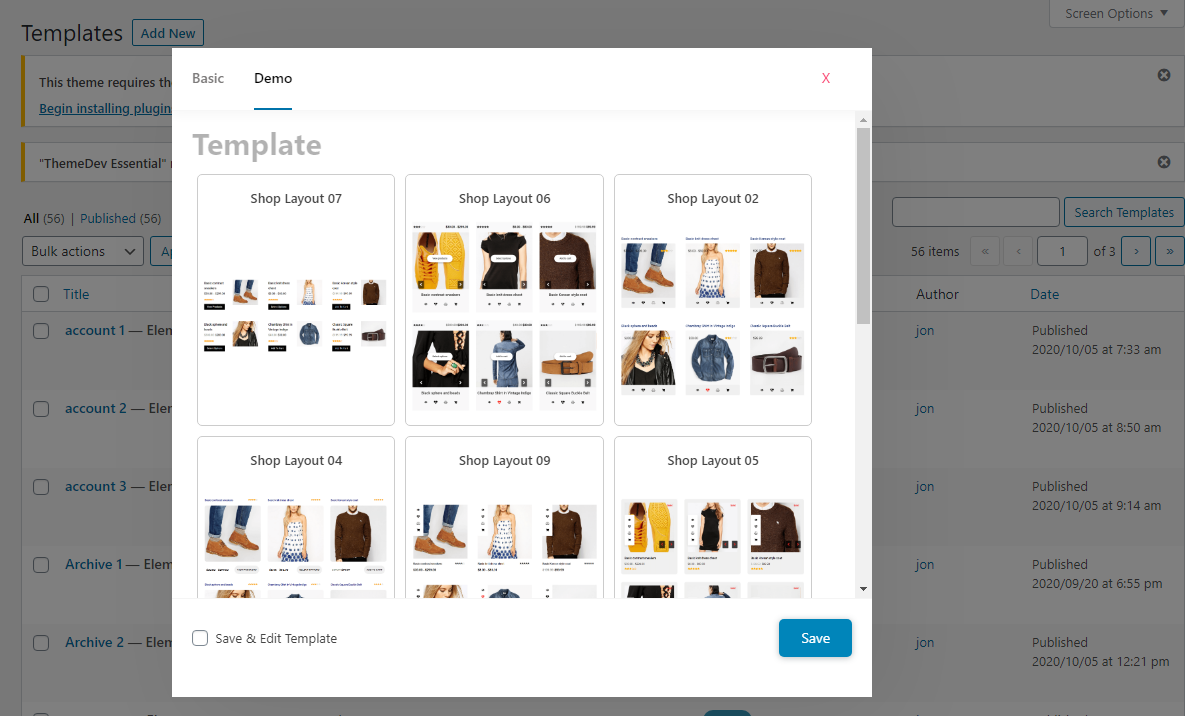
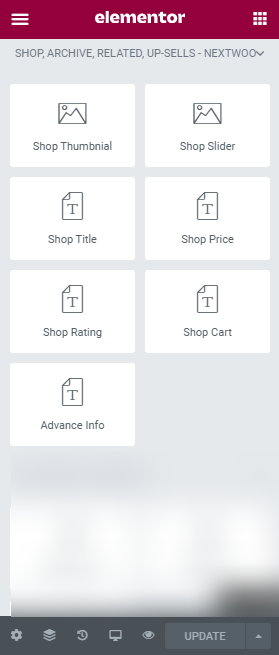
WooCommerce shop page serves as a placeholder for a post type archive to display products. To create a shop page template, just get in touch with our following rules given below.
- 1. Go to WordPress Dashboard -> NextWoo -> My Template -> Add New.
- 2. Click on the Basic tab.
- 3. Name: Give an appropriate name for the template.
- 4. Type: Select Woo Template from drop-down menu as type.
- 5. Categories: Select Shop as template category.
- 6. Set Default: Click the Set Default switch button to on it.
- 7. Finally click on the Save button.
- 8. In order to get predesigned demo, please click on the Demo tab where you will get plenty of demos.
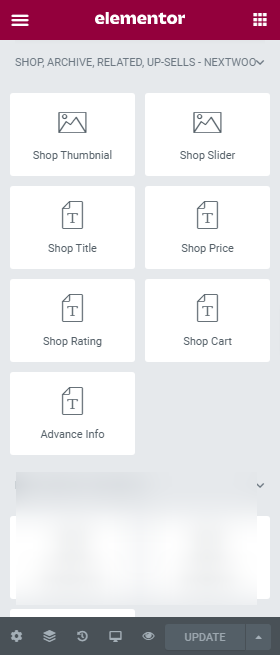
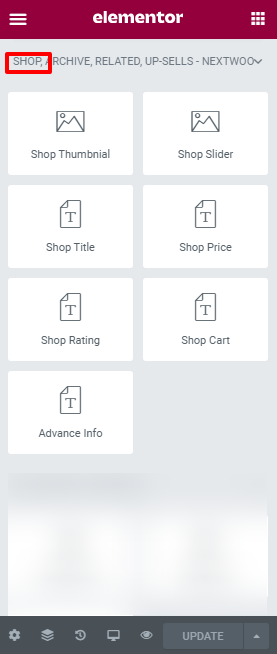
- 9. Available Elementor widget to design Shop template.
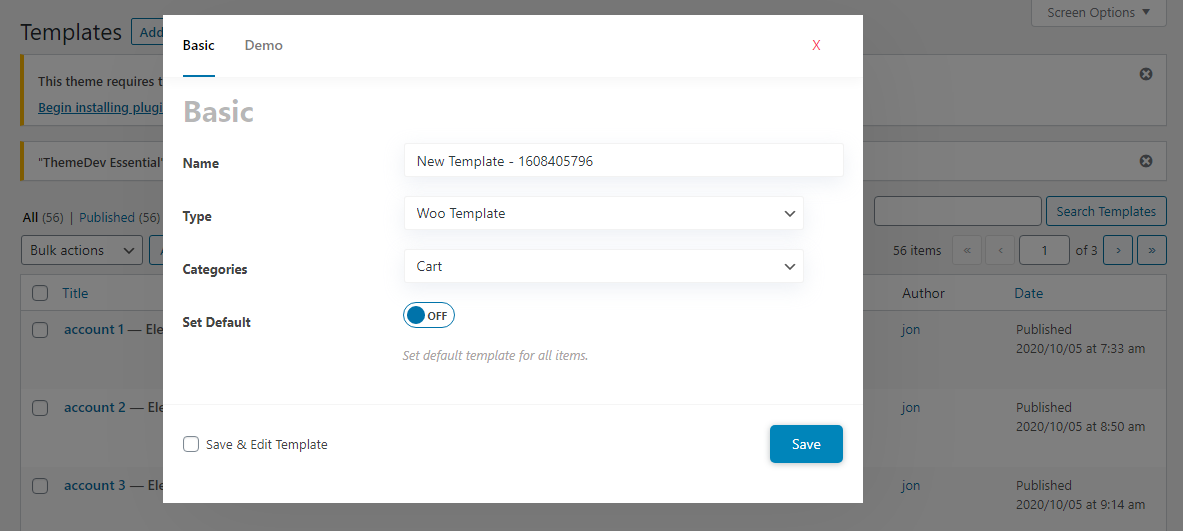
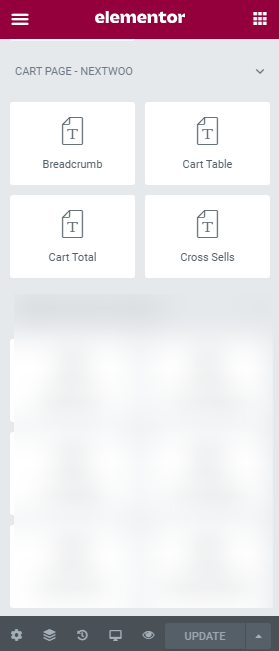
A Cart page is a mandatory part of an e-commerce site where users can accumulate what they want to buy from the websites then simply checkout by paying online. In order to create a cart page template, you have to familiar with the guidence that shown below.
- 1. Go to WordPress Dashboard -> NextWoo -> My Template -> Add New.
- 2. Click on the Basic tab.
- 3. Name: Give an appropriate name for the template.
- 4. Type: Select Woo Template from drop-down menu as type.
- 5. Categories: Select Cart as template category.
- 6. Set Default: Click the Set Default switch button to on it.
- 7. Finally click on the Save button.
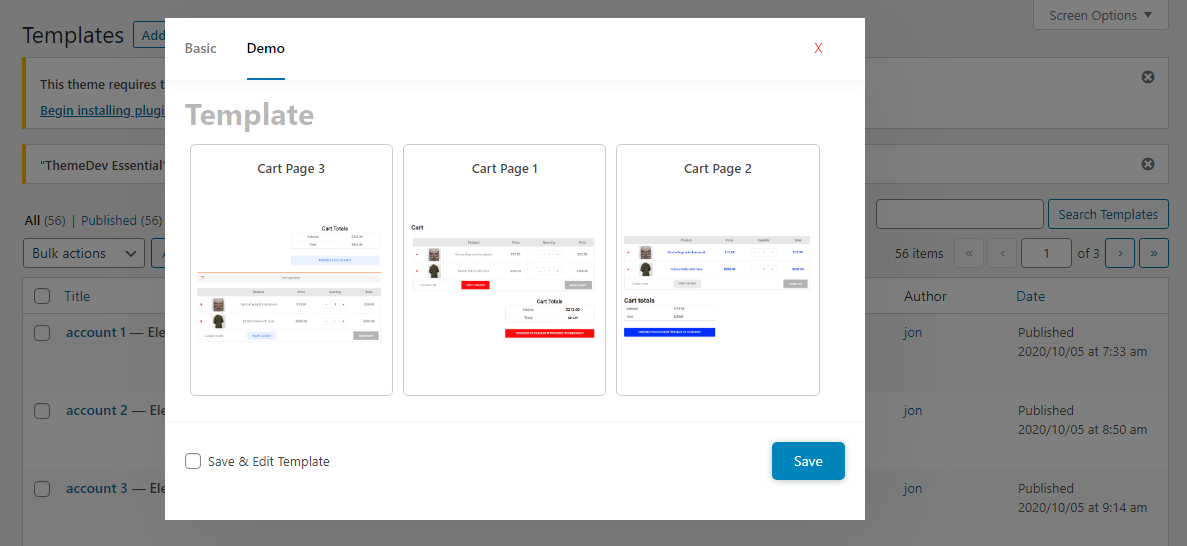
- 8. In order to get predesigned demo, please click on the Demo tab where you will get plenty of demos.
- 9. Available Elementor widget to design Cart template.
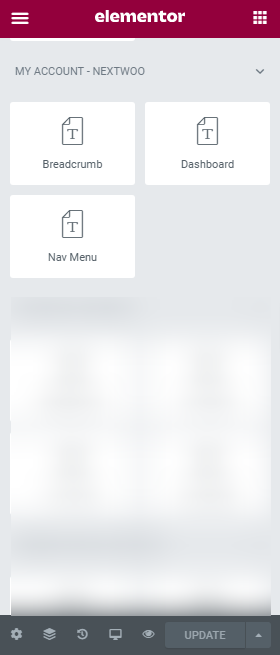
Grab the following steps given below to design my account page template in the woo-commerce.
- 1. Go to WordPress Dashboard -> NextWoo -> My Template -> Add New.
- 2. Click on the Basic tab.
- 3. Name: Give an appropriate name for the template.
- 4. Type: Select Woo Template from drop-down menu as type.
- 5. Categories: Select My Account as template category.
- 6. Set Default: Click the Set Default switch button to on it.
- 7. Finally click on the Save button.
- 8. In order to get predesigned demo, please click on the Demo tab where you will get plenty of demos.
- 9. Available Elementor widget to design My Account template.
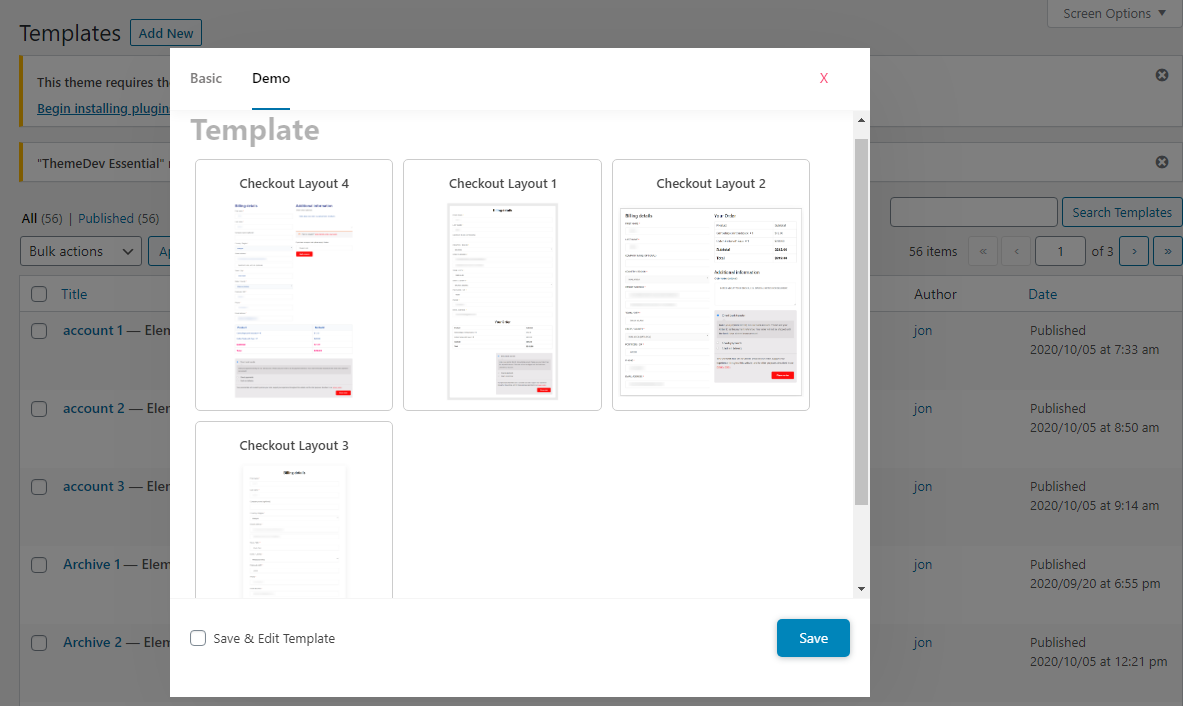
A checkout page displays all elements of a standard checkout including basket contents, billing and shipping address, shipping options, and payment information. We have some rules to create a checkout page template.
- 1. Go to WordPress Dashboard -> NextWoo -> My Template -> Add New.
- 2. Click on the Basic tab.
- 3. Name: Give an appropriate name for the template.
- 4. Type: Select Woo Template from drop-down menu as type.
- 5. Categories: Select Checkout as template category.
- 6. Set Default: Click the Set Default switch button to on it.
- 7. Finally click on the Save button.
- 8. In order to get predesigned demo, please click on the Demo tab where you will get plenty of demos.
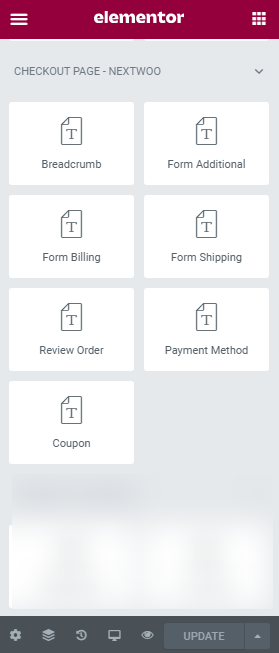
- 9. Available Elementor widget to design Checkout template.

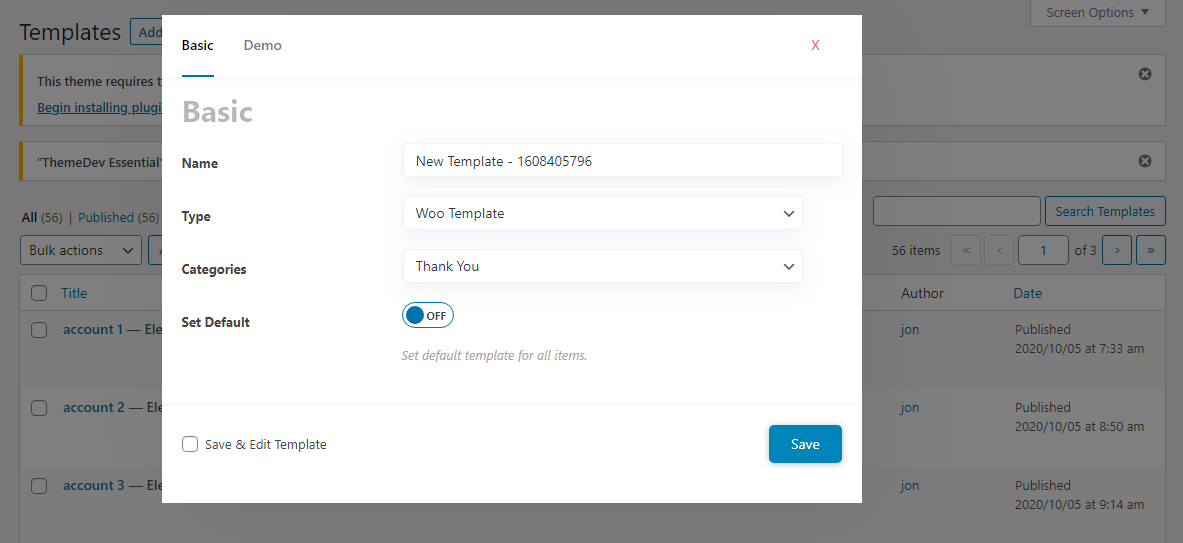
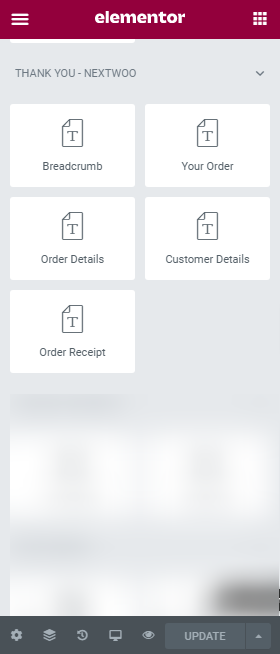
To design a thank you page template in woo-commerce site you need to famailiar with the rules shown below.
- 1. Go to WordPress Dashboard -> NextWoo -> My Template -> Add New.
- 2. Click on the Basic tab.
- 3. Name: Give an appropriate name for the template.
- 4. Type: Select Woo Template from drop-down menu as type.
- 5. Categories: Select Thank You as template category.
- 6. Set Default: Click the Set Default switch button to on it.
- 7. Finally click on the Save button.
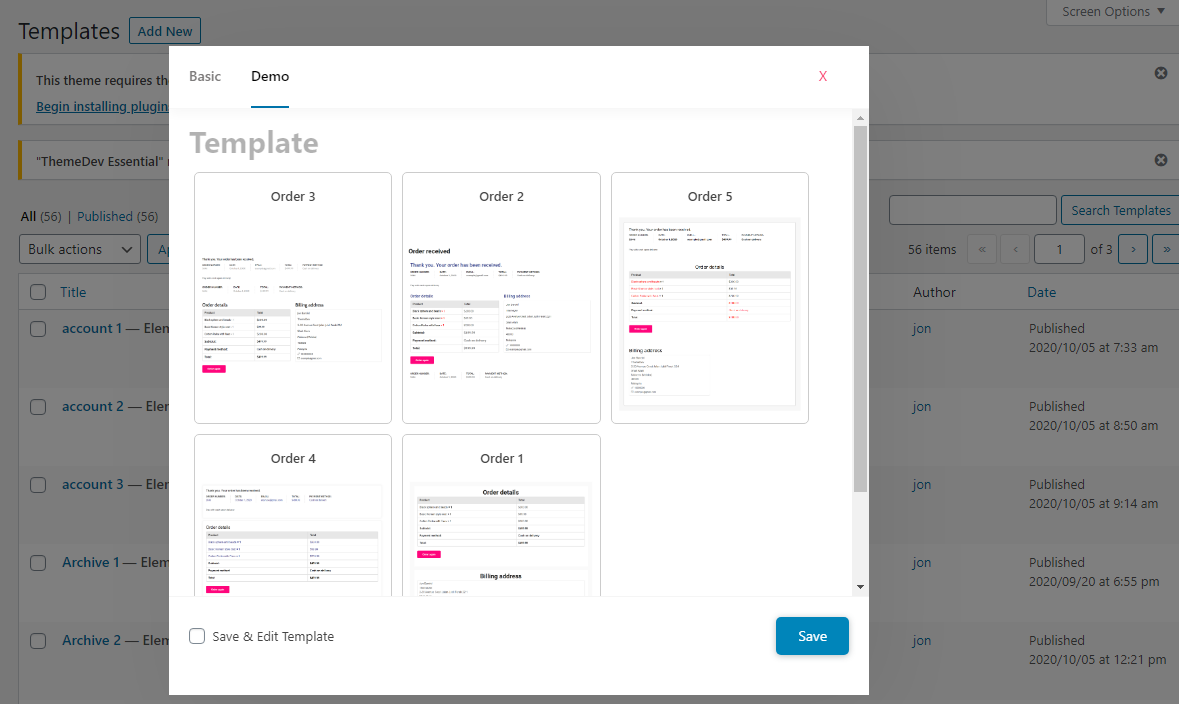
- 8. In order to get predesigned demo, please click on the Demo tab where you will get plenty of demos.
- 9. Available Elementor widget to design Thank You template.
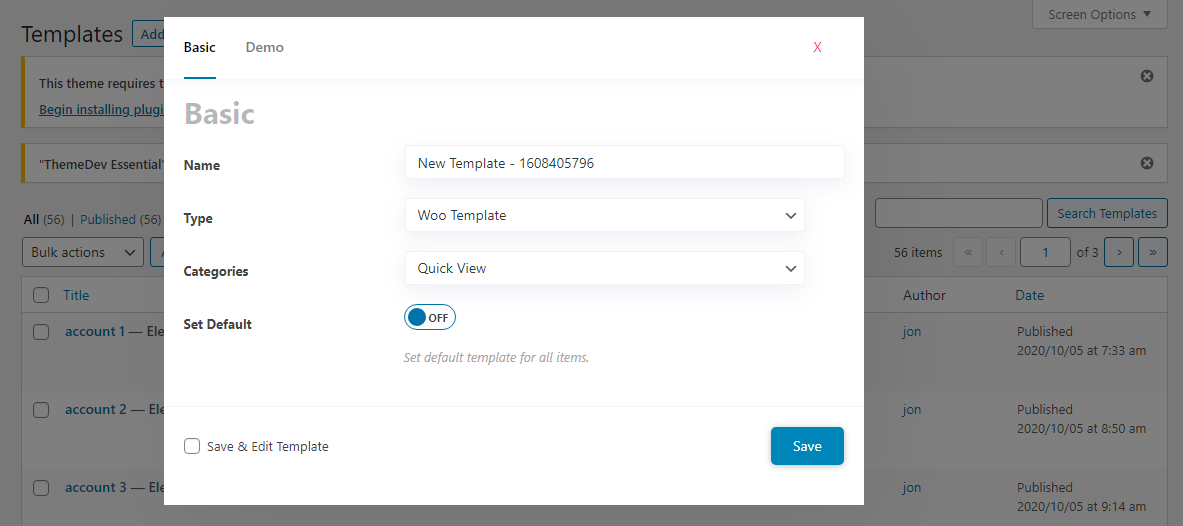
To design a thank you page template in woo-commerce site you need to famailiar with the rules shown below.
- 1. Go to WordPress Dashboard -> NextWoo -> My Template -> Add New.
- 2. Click on the Basic tab.
- 3. Name: Give an appropriate name for the template.
- 4. Type: Select Woo Template from drop-down menu as type.
- 5. Categories: Select Quick View as template category.
- 6. Set Default: Click the Set Default switch button to on it.
- 7. Finally click on the Save button.
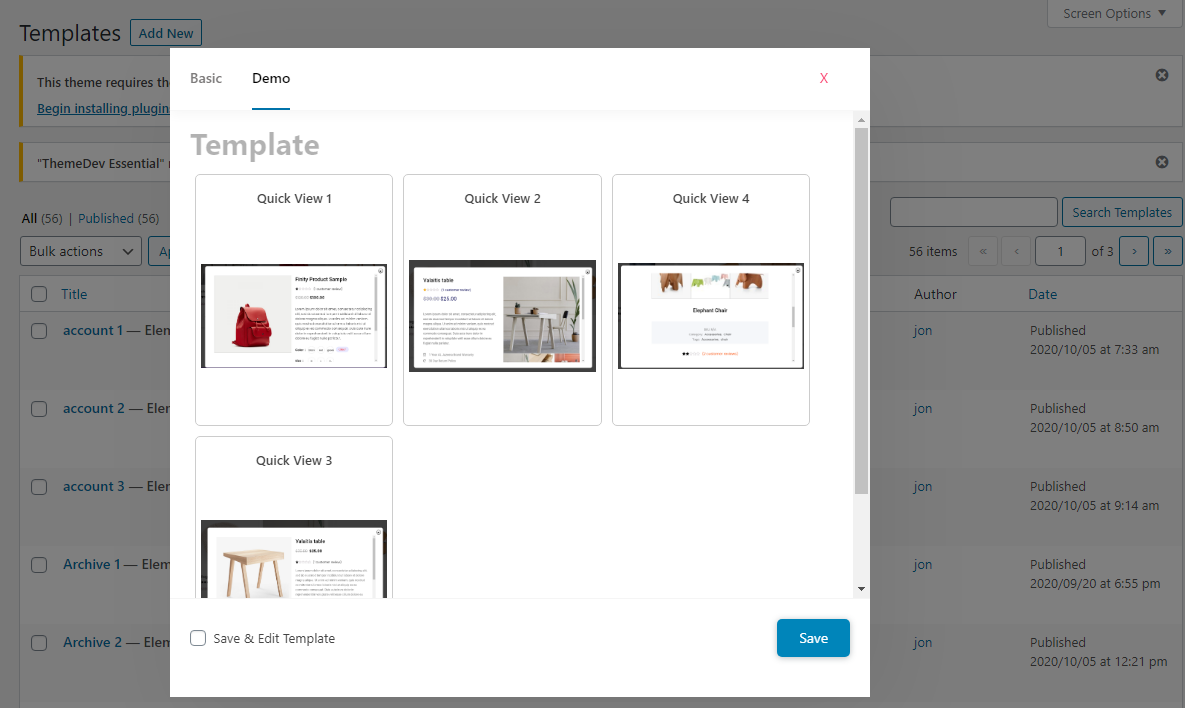
- 8. In order to get predesigned demo, please click on the Demo tab where you will get plenty of demos.
- 9. Available Elementor widget to design Quick View template.
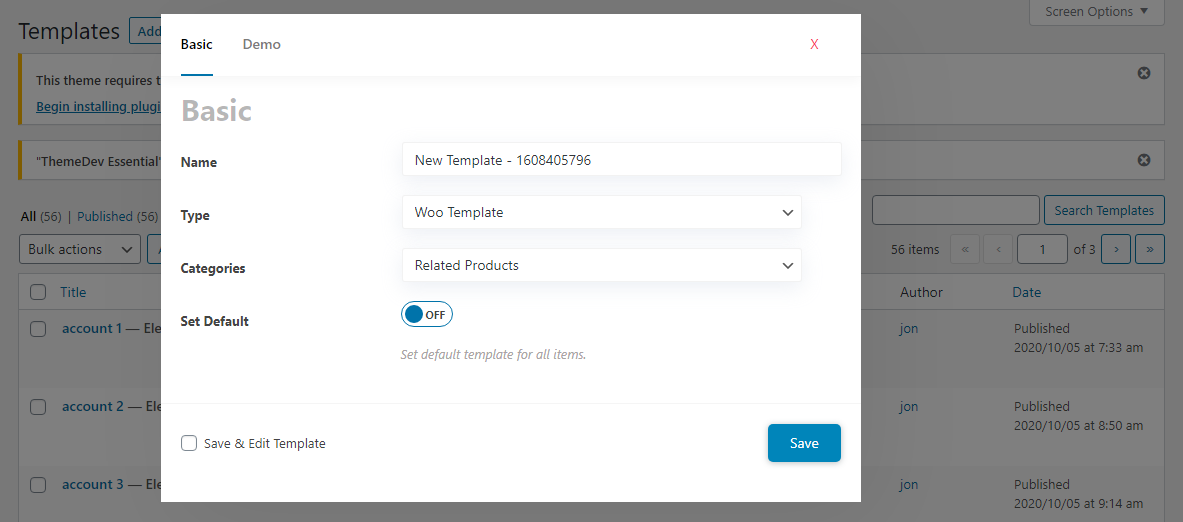
To design a thank you page template in woo-commerce site you need to famailiar with the rules shown below.
- 1. Go to WordPress Dashboard -> NextWoo -> My Template -> Add New.
- 2. Click on the Basic tab.
- 3. Name: Give an appropriate name for the template.
- 4. Type: Select Woo Template from drop-down menu as type.
- 5. Categories: Select Related Products as template category.
- 6. Set Default: Click the Set Default switch button to on it.
- 7. Finally click on the Save button.
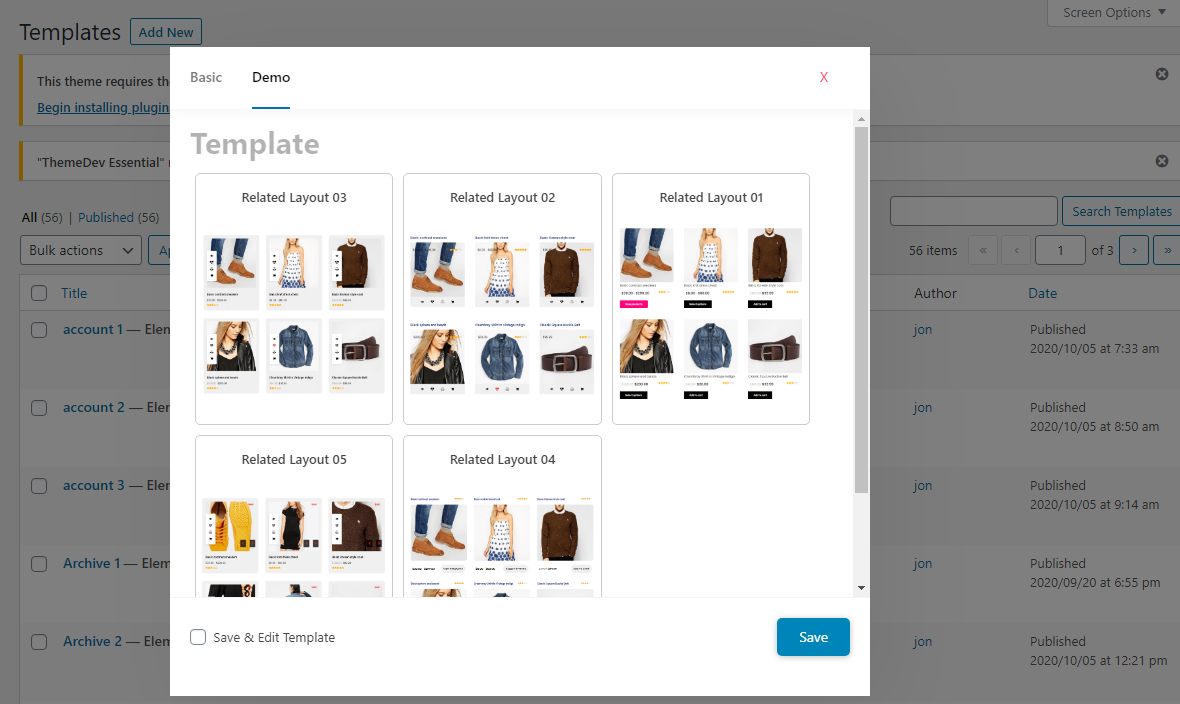
- 8. In order to get predesigned demo, please click on the Demo tab where you will get plenty of demos.
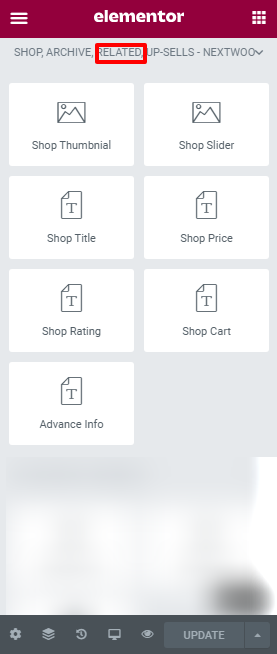
- 9. Available Elementor widget to design Related Products template.
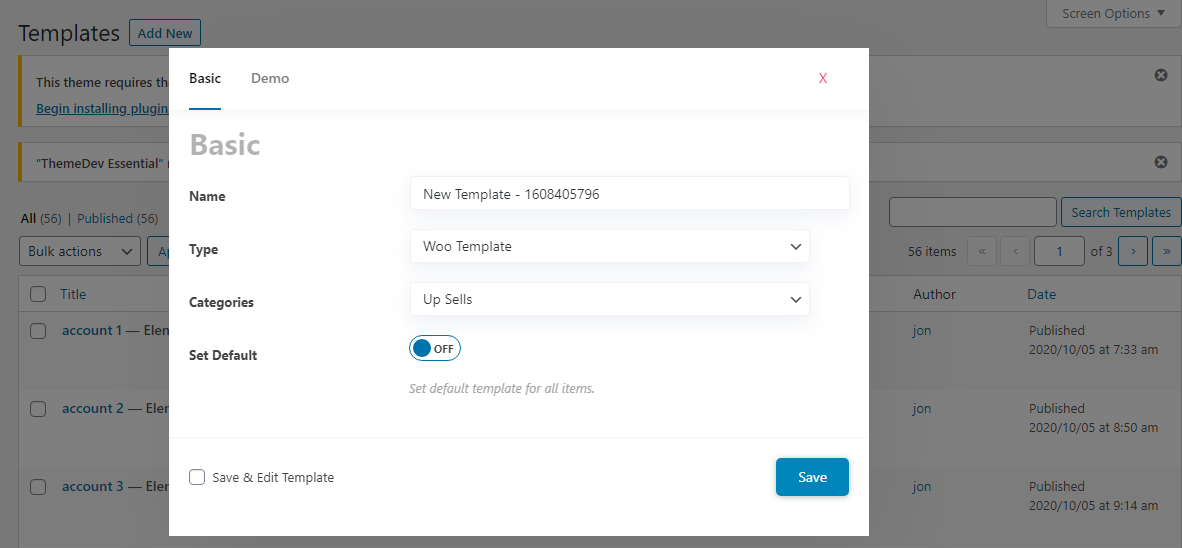
To design a thank you page template in woo-commerce site you need to famailiar with the rules shown below.
- 1. Go to WordPress Dashboard -> NextWoo -> My Template -> Add New.
- 2. Click on the Basic tab.
- 3. Name: Give an appropriate name for the template.
- 4. Type: Select Woo Template from drop-down menu as type.
- 5. Categories: Select Up Sells as template category.
- 6. Set Default: Click the Set Default switch button to on it.
- 7. Finally click on the Save button.
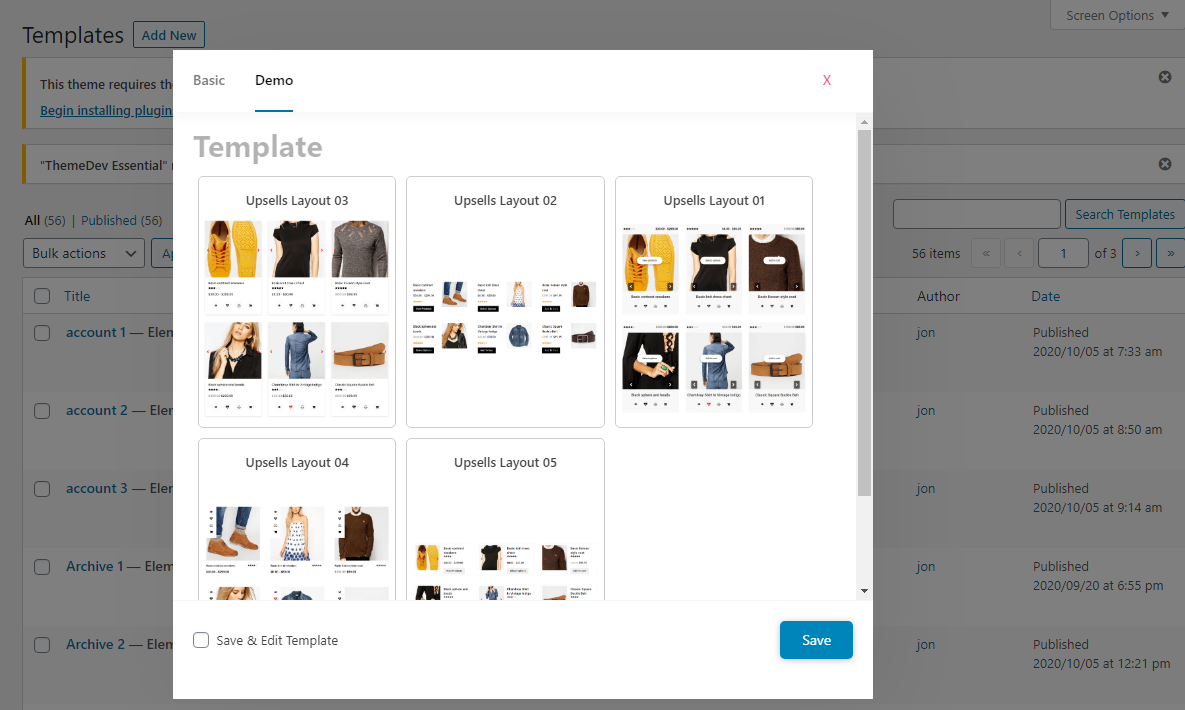
- 8. In order to get predesigned demo, please click on the Demo tab where you will get plenty of demos.
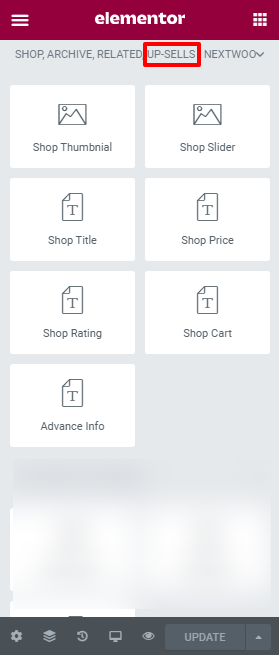
- 9. Available Elementor widget to design Up Sells template.
Release Notes #back to top
v4.0.5 - New features & Modules
- Module: NextWoo with PDF Order
- New: Extra control of Elementor & Gutenberg
- New: Ready templates of Elementor & Gutenberg Editor
v4.0.4 - Css Modify
- New: Ready Landing Product Templates
- Fix: Modify Ready templates
- Fix: Js issues fixed
- Fix: Css issues fixed
v4.0.2 - Plugin dashboard modify
- New: Create/Manage My Templates system modified.
- New: New Elementor and Gutenberg Demo (https://nextwoo.themedev.net/)
- New: Demo Export / Import System
- New: Ready Tempplates (200+ templates design) Elementor & Gutenberg
- Fix: Product swatch issues fixed
- Fix: Js issues fixed
- Fix: Css issues fixed
v4.0.0 - Added new features and Elementor Control Update
- New: New Elementor and Gutenberg Demo (https://nextwoo.themedev.net/)
- New: Added new Elementor Control and Gutenberg
- Fix: Product swatch issues fixed
- Fix: Js issues fixed
v3.1.2 - Added new features of variable swatch products
- Add multiple swatch item (Color, Size, Icon, Image)
- Js issues modify
v3.1.0 - Css modify and added extra widgets
- Add extra widgets
- Css modify
- widgets control modify
v3.0.0 - Big Chnages
- NextWoo Dashboard Design totaly modifed.
- Free and PRO version marged. No need install "nextwoo-for-woocommerce" free version.
- JS and CSS issues Solved
v2.0.0
- Added new features for Veriable Product Widgets, Quick View, Related Layout builder, Cross sale Builder, Up-sell Builder, and so on
- Demo layout(Single, Product, shop, categories, related, my account, cart, checkout)
- Gutenbureg block render issues and css issues fixed
v1.0.0
- Initail Release